How to Fix Secure Boot Issues on Windows
Follow these steps to modify the Secure Boot settings in the Windows Registry:
-
Open the Run Dialog:
- Press the
Windows + Rkeys on your keyboard simultaneously. This will open the Run dialog box.
- Press the
-
Open the Registry Editor:
- Type
regeditin the Run dialog box and pressEnter. If prompted by User Account Control (UAC), click “Yes” to allow changes.
- Type
-
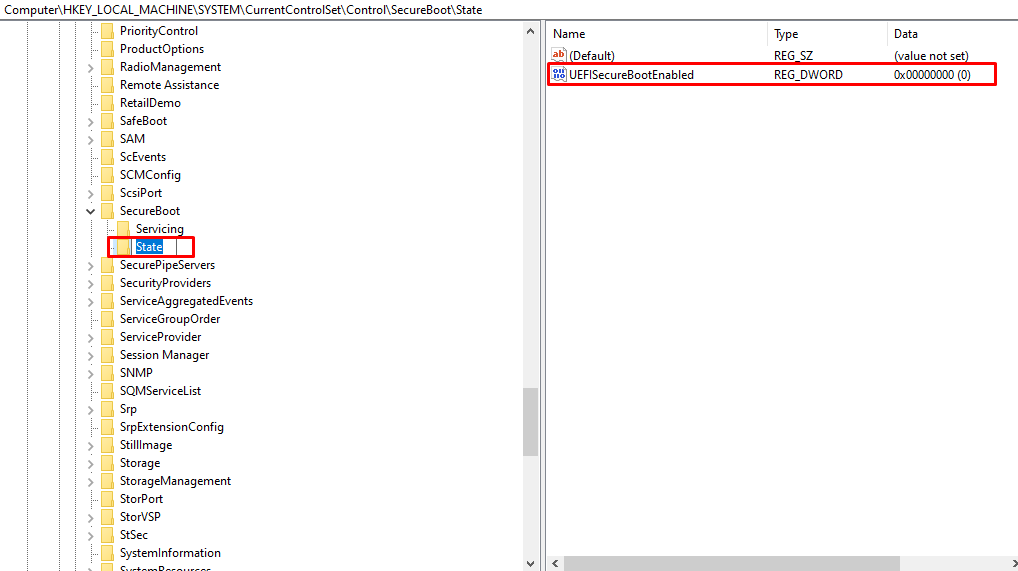
Navigate to Secure Boot State:
- In the Registry Editor, use the sidebar to navigate to the following path:
HKEY_LOCAL_MACHINESYSTEMCurrentControlSetControlSecureBootState
- In the Registry Editor, use the sidebar to navigate to the following path:
-
Create the Secure Boot State Key (if it doesn’t exist):
- If the
SecureBootorStatefolder does not exist, you need to create it. To do this:- Right-click on the
Controlfolder. - Select
New > Key. - Name the new key
SecureBoot. - Right-click on the
SecureBootfolder you just created. - Select
New > Key. - Name this key
State.
- Right-click on the
- If the

5. Create the UEFISecureBootEnabled Value:
-
- With the
Statekey selected, right-click in the right pane of the Registry Editor. - Choose
New > DWORD (32-bit) Value. - Name the new value
UEFISecureBootEnabled.
- With the
6. Modfy the Value Data
-
- Double-click on
UEFISecureBootEnabledto modify its value. - In the “Value data” field, enter
0and clickOK.
- Double-click on

7. Finish and Restart:
-
- Close the Registry Editor.
- Restart your computer for the changes to take effect.

